Showing posts with label Ms Dynamics CRM 2011. Show all posts

Monday, 10 February 2014

How to form dynamic hyperlink URL for email Template in CRM 2011

Problem:  How to form dynamic URL in email Template.

Solution:

I had a situation in which my workflow had to kick off emails to the sales Rep and those email contain the URL to the record. Now I had to form that URL at run-time grabbing the Guid of the record.

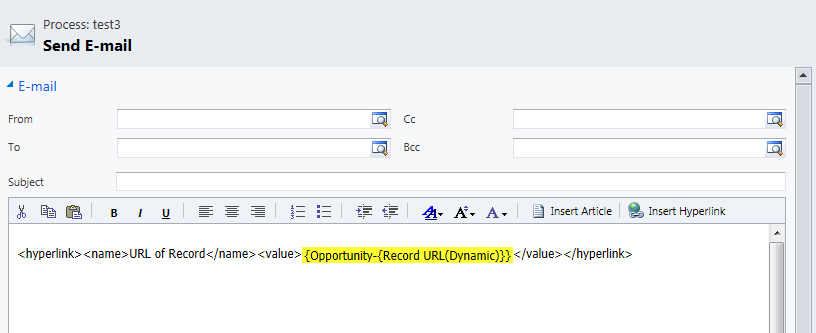
You can achieve this by two way either you can use the "Insert hyperlink" option available in design template as shown below or form URL on your own discuss later in this article:


Once the hyperlink window is opened you can fill the name you want to show and select the “Record URL(Dynamic)” as value and hit ok.


So now when the email is generated you get the link to opportunity record.

But if you want to form the URL dynamically say to open other record or open outlook or link to some another page etc. then you need to form hyperlink on your own.

For example I want to set URL for another record not opportunity from this email template. To achieve this task we will grab the tags that are generated by "Insert hyperlink" option and then edit the values inside it according to our requirements.

<hyperlink>
    <name>
    </name>
    <value>
    </value>
</hyperlink>

This is the basic tags now we will fill the data inside this tag as per our requirements.
<hyperlink>
    <name> URL to Another entity</name>
    <value>https://servername/OrganizationName/userdefined/edit.aspx?etc=10033&id={Guid Of Parent Entity(GetGuidOfParentEntity)}</value>
</hyperlink>

Here I am grabbing the guid of Parent entity by custom workflow utility. 10033 is the entity code for the entity whose record I want to pull out. You can replace servername and organizationName according to your structure.

Thanks,

Friday, 7 February 2014

How to grab the entity code for specific entities.

Problem:  How to grab the entity code for specific entities.

Solution:


Sometimes you need entity code in CRM 2011 to form the URL or for any other purpose. For that you can write following query to your SQL Server to grab the entity code given the entity name:

select ObjectTypeCode,LogicalName
from EntityLogicalView
where LogicalName like 'yourEntityName%'
  
EntityLogicalView table stores all entity related information.


Thanks,

CRM 2011 graph display error message: Maximum Record Limit is exceeded

Problem:  when chart is displayed in CRM 2011 we get an error message.

Solution:
Sometimes when chart get displayed in CRM 2011 you get error message indicating that “Maximum record limit is exceeded. Reduce the number of records."

This error is because in SQL Server there is max record limit set for charts to display data. This means, query that you placed for charts is grabbing more data than max record limit and so you end up getting this error.

To resolve this issue either you need to change your query to grab lesser data or if that is not possible you need to increase the max record limit in SQL Server.

If you want to increase the max record limit in SQL Server than you need to update Deployment Properties table in MSCRM_CONFIG database.

you can execute following query:

update MSCRM_CONFIG.dbo.DeploymentProperties
set IntColumn = 10000000
where ColumnName = 'AggregateQueryRecordLimit'

  
Thanks,

Monday, 3 February 2014

Get Started Pane showing up error message.

Problem:  Get Started Pane in CRM 2011 showing up error message.

Solution:
Sometimes when you update the system or change the port you can end up with error getting displayed in the “Get started Pane” in CRM. For example you changed the port i.e. moved from http to https.

In you SQL Server there is database name “MSCRM_CONFIG” that contains ConfigSettings table. This table has field named “HelpServerUrl”. This field might not be updated or contain correct URL and that might be the cause of error in your Get Started Pane.

Update the value in “HelpServerUrl” field to correct URL and port. I mean if you moved from http to https then you need to give the correct webserver URL and port.

After changing URL perform IIS reset and you should get rid of error.

Thanks,

Friday, 11 October 2013

How to customize the ribbon on Form to hide button in CRM 2011.

Problem:  Came across the situation in which I want to hide a button on Form.

Solution:

To solve this issue either you can write javascript to hide button or customize the ribbon. I realized the good way to achieve this task was to customize the ribbon.

a) If we want to hide the button on the MainTab of entity then the process is simple as follows:
  1.     Create the empty solution and add the entity from which you want to remove the button (for eg. Accounts)
  2.     Export the solution, unzip and open Customization.xml.
  3.     Locate “RibbonDiffXml”. Write the following code inside the node.
            <RibbonDiffXml>
                     <CustomActions>
                            <HideCustomAction Location="Mscrm.Form.account.Assign"       
                                                            HideActionId="form.HideAction" />

                    </CustomActions>

          Here location indicates the button that you want to hide. We have taken an example to hide “Assign” button on MainTab.

       4.  Save the file.
       5.  Zip the solution, Import and Publish the changes.

b)  But what If we want to hide button on the subgrid section. Say we have “TestEntity” related to Accounts and I want to hide the buttons which says “Add new TestEntity”.

       1. Create empty solution and export “TestEntity”.
       2. Open Customization.xml and locate “RibbonDiffXml”.
       3. Include the following code inside the node.

             <RibbonDiffXml>
                      <CustomActions>
                              <HideCustomAction Location="Mscrm.SubGrid.TestEntity.AddNewStandard"
                                                              HideActionId="Subgrid.HideAction" />
                      </CustomActions>

        So this action will hide the button from subgrid of all entities related with “TestEntity”.

       4. Save the file.
       5. Zip the solution, Import and Publish the changes.

Thanks,

Thursday, 10 October 2013

Adding a custom tooltip to CRM 2011 entity field

Problem: I had requirement from user to add custom tooltip to drop down list (OptionSet) field on Entity form in CRM 2011.

Solution:

I knew that we have default tooltip for each option with in the OptionSet but here user wanted to have custom tooltip. So I had to write JavaScript to achieve this task.

On form load event you need to write following code to add the custom tooltip

crmForm.all.dropdownlistName.childNodes[0].title = 'Text to be displayed in tooltip';

So above code will display tooltip for the first option in OptionSet. Similarly you can add tooltip to any field on Entity form in CRM 2011.

This method works fine for me on CRM 2011 Rollup 13.

Thanks,

Friday, 4 October 2013

How assigning Activate/Deactivate permissions to user in Microsoft Dynamics CRM 2011

Problem:  I had a situation in which we wanted to prevent any random user to activate or deactivate record on certain entity. We wanted only people with specific roles to have permission to activate or deactivate the record.

Solution:

After doing my research I realized that you don’t have direct way to give permission in CRM 2011 for activation/deactivation of record. So you can do this by either by writing a javascript or by writing a plugin. There might be other ways to achieve this task as well but according to me the best method will be to write a plugin.

We can write a plugin that fries up when user tries to activate/deactivate the record and at this time we can check the role associated with user. If user is not from the role we want throw exception.

Following steps can be performed to achieve the result:
1.      Write a plugin that contains code to access role and systemuser
     QueryExpression query = new QueryExpression()
     {
       LinkEntities =
                    {                         
                      new LinkEntity
                      {
                           LinkFromEntityName = "role",
                           LinkFromAttributeName = "roleid",
                           LinkToEntityName = "systemuserroles",
                           LinkToAttributeName = "roleid",
                           LinkCriteria = new FilterExpression
                           {
                                FilterOperator = LogicalOperator.And,
                                Conditions =
                                {
                                   new ConditionExpression
                                   {
                                      AttributeName = "systemuserid",
                                      Operator = ConditionOperator.Equal,
                                      Values = { context.InitiatingUserId }
                                   }
                                }
                           }
                        }
                     },
          Criteria = new FilterExpression
                     {
                       Conditions =
                       {
                          new ConditionExpression(
                                                   "name",
                                                   ConditionOperator.In,
                                                   new string[]
                                                   {
                                                     "sc test Role",
                                                     "System Administrator"
                                                   }
                                                 )
                        }
                      }
            };

            query.EntityName = "role";

            query.ColumnSet = new ColumnSet("roleid");

            EntityCollection userRoles = service.RetrieveMultiple(query);

            if (userRoles.Entities.Count==0)
            {
                throw new InvalidPluginExecutionException
                         (
                           OperationStatus.Canceled,
                           "You are not allowed to deactivate record"                      
                         );
            }

So the plugin will throw error if the user is not from the two roles mention.

2.      Next step is to register plugin on Pre-operation of “SetStateDynamicEntity”. Set Primary entity value as the entity for which you want to perform this operation.


Thanks,

Wednesday, 14 August 2013

User Query/Saved Query Views in CRM 2011

Problem:
I came across situation where i needed to grab all the user-defined private views for a particular entity within the organization.

Solution:
  1. First of all there are two types of views, one that is defined by user that is user's private view and other is system defined or public views that is available to all users.
  2. The user defined views are stored in "UserQuery" and the system defined views are stored in "SavedQuery" within database. 
  3. To get the all user defined views for the specific entity you can execute following sql query against your database.   
             select Name as ViewName ,
             OwnerIdName as Owner,
             case statecode when 0 then 'Active'
                                        when 1 then 'Inactive'
             end as Status,
             UserQuery.Description
             from UserQuery
             where ReturnedTypeCode= #entitycode(integer)
             order by OwnerIdName, Name

         Here the ReturnTypeCode is the entity code that indicates the entity that is returned as result of the                view. So if you need to get all the user defined view for account entity then you must right the 
         entity code for account entity.
  1. You can grab the system views by going into customizations. Say you want to get the system views for account entity then you can go to settings-> customization-> Entities-> Accounts-> Views.
  2. However you can also get them from the database. You can execute following sql query against the database.
                select Name as ViewName ,
                SavedQuery.CreatedByName as  Owner,
                case statecode when 0 then 'Active'
                                           when 1 then 'Inactive'
                end as Status,
                SavedQuery.Description
                from SavedQuery
                where ReturnedTypeCode=10034
                order by CreatedByName, Name

Hope this helps,

Thanks

Friday, 2 August 2013

To create default custom view for a lookup field in CRM 2011 using Javascript.


Problem: I came across situation where I need to create a default custom view when the page is loaded for a lookup field. Along with that I also didn’t wanted to disable the view selector option so user cannot select any other view except my custom view.

 Solution:

To achieve this target I knew that we need a javascript that executes when the form is loaded.

1.      First step is to create a web resource that can hold this javascript. (click here learn how tocreate a web resource)

2.      Once your web resource is ready we need to form the fetchxml query that grabs the required data based on our requirement.

3.      So you can simply go to advanced finds and form the query logic to grab your data. Suppose you want all grab all opportunities linked with specific account for the enity. (This is pretty simple task custom views are used for more complex task).


4.      Once the query is form hit the “Download fetchxml” button on top ribbon in Advanced Finds. This will give you a fetchxml of the query. You need to copy this in your javascript code.

5.      Next step is to form the layoutxml , this determines which columns from the entity is display in your lookup result. Finally your code will look like this.

function LoadCustomView()
{
  //get the guid of account
  var acctId = Xrm.Page.getAttribute("lookupfieldnameforAccount").getValue()[0].id;

  //Fetch xml from the advanced find. Need to format this
  var fetchxml=
"<fetch version='1.0' output-format='xml-platform' mapping='logical' distinct='false'>" +
  "<entity name='opportunity'>" +
     "<attribute name='name' />" +
     "<attribute name='customerid' />" +
     "<attribute name='opportunityid' />" +
     "<order attribute='customerid' descending='false' />" +
     "<link-entity name='account' from='accountid' to='customerid' alias='aa'>" +
     "<filter type='and'>" +
      "<condition attribute='accountnumber' operator='eq' value='" + acctId + "' />" +
     "</filter>"+
   "</link-entity>" +
  "</entity>" +
"</fetch>"

//Layout xml shows that row and column structure in view
var layoutXml =
"<grid name='opportunities' object='10017' jump='name' select='1' icon='1' preview='1'>" +
   "<row name='opportunity' id='opportunityid'>" +
          "<cell name='name' width='200' />" +
          "<cell name='customerid' width='200' />" +
     "</row>" +
 "</grid>";


var viewId = "{00000000-0000-0000-0000-000000000000}"//make sure this is guid
var entityName = "opportunity";//name of entity for which we are defining the custom view
var viewDisplayName = "Any name you want to show up"//Name that show up in view selector

//pass all parameters to function and last value true makes this view as default view.

Xrm.Page.getControl('lookupfieldnameforopp').addCustomView
       (viewId, entityName, viewDisplayName, fetchXml, layoutXml, true); 
}

·       So first I grab the account id and use that in Fetchxml to grab all opportunities associated with 
       that account.
·         Make sure this lookup field is set properly on form. The view selector should show "show all 
       views".

6.      Now you want to disable the view selector panel so that user cannot select any other view that except the default custom view you provide. For that you need to add following line after your addcustomview line.

                       document.getElementById("lookfieldforopp").setAttribute("disableViewPicker","1");

7.      Now you can save and publish the web resource and check the out your view by opening up the page.


Hope this helps,
Thanks

Tuesday, 30 July 2013

Creating custom ribbon button on Entity form/Grid Main page in Microsoft Dynamics CRM 2011


Problem:

I got into situation where I wanted to create the custom ribbon button in MS Dynamics CRM 2011 on the entity form as well as on the entity Grid main page.

Solution:

The following steps can be performed to achieve the target:
1. In CRM go to Setting->Customizations->Solutions.


2. In CRM 2011 go to Setting->Customizations->Solutions. Click New to create the empty         
    solution to export the entity for which you want to create the button (either on entity form or on
    Grid). Here I have taken example of Account entity.


    Here publisher is the default publisher for your crm.

3. Add the account entity to the empty solution. Do not include the dependent components in the
   solution.

4.Export the solution and don’t forget to publish all customization before exporting the solution to   
   ensure you have all updated customization for the entity.

5. Once you export the solution unzip the solution and open customizations.xml file from the solution
    folder.

6. Look for the tag  <RibbonDiffXml> within customization.xml file. You need to add code for
    custom button within this tag. Since this is a custom operation we add a <customActions>
    tag where we will add all our custom action to be done.

 
<RibbonDiffXml>

  <CustomActions>

   <CustomAction Id="Mscrm.account.Form.CustomAction"

      Location="Mscrm.Form.account.MainTab.Actions.Controls._children"

      Sequence="41">

   <CommandUIDefinition>

     <Button Id="Mscrm.account.Form.HelpButton"

             Command="Mscrm.account.Form.HelpButton.Command"   

             LabelText="$LocLabels:Mscrm.account.HelpButton.LabelText"

             ToolTipTitle="$LocLabels:Mscrm.account.HelpButton.LabelText"

             ToolTipDescription="$LocLabels:Mscrm.account.HelpButton.ToolTip"

             TemplateAlias="o1"

             Image16by16="$webresource:scc_imghelp16x16"

             Image32by32="$webresource:scc_imghelp32x32" />

   </CommandUIDefinition>

 </CustomAction>

</CustomActions>

  • Here we added one custom action with location attribute. Note location attribute is important as it determines the exact position in your CRM entity ribbon where your custom button will be displayed. Here the button will be displayed on Account form ribbon in Actions Group
  • Sequence determines the order of button display if you have more than one button displayed in Actions group. Sometimes if you don’t mention proper sequence then your button might not appear in correct order in group.
  • Now we need to add commandUIDefinition tag and then define a Button within it.
  • For the labelText, ToolTipText , ToolTipDescription we have defined the local labels. If you want you can directly assign text values while defining the button.
  • For image displayed on button you need to create webresources for each 16x16 and 32x32 size. (check here on how to create image web resource)
7. Next step is to locate/Create <CommandDefinitions> tag. Add following code.

   <CommandDefinitions>
       <CommandDefinition Id=Mscrm.account.Form.HelpButton.Command>
            <EnableRules>
              <EnableRule Id=Mscrm.account.WebClient.EnableRule />
            </EnableRules>
            <DisplayRules/>
            <Actions>
              <JavaScriptFunction FunctionName=HelpFunction
                                  Library=$Webresource:Launch_Help.js />
            </Actions>
       </CommandDefinition>
   </CommandDefinitions>
  • This section defines the action for the button. So we “id” value of <commandDefinition> tag contains value of command attribute defined in button tag.
  • Enable rule – defines conditions when you want to enable the button.
  • Display rule – defines the display condition for button.
  • Actions – defines the action to be performed when the button is clicked. Here we are calling a javascript function (HelpFunction) defined within webresource (Launch_Help.js).

8. Next step is to define the enable rule  in <RuleDefinitions> tag.

     <RuleDefinitions
          <TabDisplayRules />
          <DisplayRules />
          <EnableRules>
            <EnableRule Id="Mscrm.account.WebClient.EnableRule">
              <CrmClientTypeRule Type="Web" />
            </EnableRule>
          </EnableRules>
      </RuleDefinitions>

9. Lastly add local Labels containing text and tooltip for button.

  <LocLabels>
       <LocLabel Id="Mscrm.account.HelpButton.LabelText">
          <Titles>
             <Title languagecode="1033" description="Help" />
          </Titles>
       </LocLabel>
       <LocLabel Id="Mscrm.account.HelpButton.ToolTip">
         <Titles>
            <Title languagecode="1033" description="ToolTip for the button" />
         </Titles>
       </LocLabel>
     </LocLabels>
  </RibbonDiffXml>

10.  Once the code has been added save the file and zip the solution containing all three files together.

11.   Import the updated solution back and publish all the customization. You should see the button 
        on the Account form in Actions Group.


Now suppose you want to add the custom button to the Entity Grid Main page.


All the steps and code mentioned above remains same just need to change the location of the button in <customAction> tag
<CustomAction Id="Mscrm.account.Homepagegrid.CustomAction"
              Location="Mscrm.HomepageGrid.account.MainTab.Actions.Controls._children"
              Sequence="41">

We changed the location now to HomePageGrid of Account entity instead of Form. Everything else remain same.


When you place button on the HomePageGrid of any Entity and you want to allow button to be enabled when user select only one record from grid. You can add following enable rules to achieve this task.
<CommandDefinition Id="Mscrm.opportunity.grid.HelpButton.Command">
      <EnableRules>


        <EnableRule Id="Mscrm.opportunity.WebClient.EnableRule" />   
        <EnableRule Id="Mscrm.opportunity.OneSelected.EnableRule" />
     </EnableRules>
        <DisplayRules>
        </DisplayRules>
        <Actions>
          <JavaScriptFunction FunctionName="ExecuteFunction"   
                              Library="$Webresource:scc_Help.js" />
        </Actions>
</CommandDefinition>
 
Now defining the enable rule:
<EnableRule Id="Mscrm.opportunity.OneSelected.EnableRule">
        <SelectionCountRule AppliesTo="SelectedEntity"
                            Maximum="1"
                            Minimum="1" />   
</EnableRule>
Hope it helps you and sorry about the images.


Thanks,